
A little break from the eye's. In March it's St. Patrick's Day. In March I am vacationing in Florida. I always like to have a pocket full of Leprechaun pins to give away, when the occasion calls for it. This occasion just might be a local pub that celebrates St Patrick's day. Some times I've been known to trade a Leprechaun pin for a beer or two.

To whittle one of these pins start with a 5/8th or 1/2 inch square by 6 inch piece of Basswood. Whittle on one end while holding the other end.

These are quickly whittled on the corner of the piece of wood. First, draw the face on the corner.

The second step will result in the hat's brim being roughed in. Use the knife to make stop cuts that define the top and bottom of the hat's brim. The brim can be kind of thick, and be thinned later. After the stop cuts are made slice down to and up to these stop cuts to do the brim. You will have to keep on deepening the stop cuts as you go.

Locate the bottom of the nose and make a stop cut. Use a controlled push cut up the this stop cut, and remove the resulting chip.
 Make a stop cut on each side of the nose, that defines the nose. It's best to start this stop cut by plunging the knife tip into the wood at the top of the nose side and rocking the blade down. Angle these nose side cuts so they do not undercut the nose sides. After doing this on both sides of the nose, make the same kind of stop cut to define the top of the eye area. Remove the chip of wood that these stop cuts define.
 Use your knife to make any needed adjustments to the nose. Try to have a round end to the nose. Cut a slice out of each side to define the cheek bottoms/smile lines. Connect the two cheek bottoms with a stop cut that defines the bottom of the upper lip/mouth. Use controlled push cuts up to this stop cut.
 Use the knife to make a shallow stop cut that defines the "inside" beard line. Use a paring cut to slice down to this beard line stop cut.
 Make knife cuts to shape the bottom of the beard.
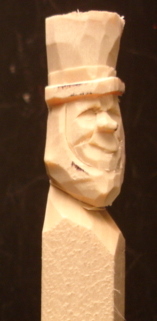 Cut the "points" off the hat's brim to make it more round. and shape the top of the hat. Add a shallow stop cut that defines the hat band, and cut down to this stop cut to further define the hat band.
 Use your knife or a small V tool to add the beard texture. Thin the hat brim a bit and shape the hat. Use a small U gouge or your knife to make the little divot between the eye brows. Use the point of your knife to cut and remove small chips to define the sides of the eyes. Finally use the knife point to cut small lines that connect the inside and outside chip divots in the eyes. These cuts will result in a slightly defined and rounded eyeball. Sorry no room for eye lids. Paint the skin area a fleshtone, the beard orange, hat green, and the hat band black. Paint the eye whites first then a black dot. If you fail to paint the beard orange and use brown, you can use the pin on Lincoln's birthday.
3 comments:
Hi Tom,
I must say like them verry much.
I have several little pieces lying around,so this will be my task for tommorow.
Thanks again for a great idea and a great explanation! I will have a go at it tommorow :-)
Best Regards, Dries
I have created a PDF of these instructions for anyone who is interested.
The link is
https://docs.google.com/open?id=0B44RyPKg3LtxRjk5d2VmUXJUeWV6XzM4YnBPWGNEUQ
Thank you for posting such a great tutorial. I have had a ton of fun with this one!
Thanks jprado,
Downloaded it immediatly.
Just to have it.
Kind regards Dries
Post a Comment