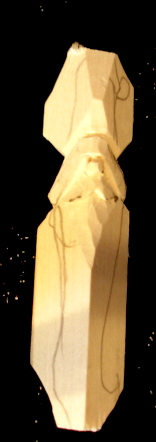
The first step is to begin to remove some excess wood. Starting at the top, remove the corners (sides and front). Make a stop cut at the top of the hat "brim", and remove a chip down to the stop cut. Where the hat "brim" dip in at the sides, remove a chip. Make a stop cut at the bottom of the nose, and remove a chip up to it. Remove the corners of the wood at the bottom.
In this step, make stop cuts that define the top and bottom of the hats "brim". This "brim" will eventually be kinda curved. To make this curve easier to carve, make it in three cuts. Cut one is at the top and bottom of the nose, and cuts two and three from the top and bottom of the nose to the sides. After these stop cuts are made, remove some wood down to the top stop cut, and up to the bottom stop cut. With the bottom stop cuts, be careful not to cut the nose.
In this step, start to round the nose. Try to make the nose a little round ball.

In this step make a stop cut that defines the bottom of the mustache, and remove some wood up to this stop cut.

In this step, shape the hat.

Cut a notch out at the bottom of the beard, and begin to carve the beard curl.

Finish carving the beard, and clean up any part of the carving that needs it.

Next you can texture the beard with a V-tool or leave it untextured. It's optional whether you wood burn the bottom of the cuts between the colors. On the example I did wood burn between the white parts of the hat and the rest of the piece. Then I like to scrub the piece with a stiff denture brush and liquid soap. After rinsing the piece, and letting it dry paint it.


 In this step make a stop cut that defines the bottom of the mustache, and remove some wood up to this stop cut.
 In this step, shape the hat.
 Cut a notch out at the bottom of the beard, and begin to carve the beard curl.
 Finish carving the beard, and clean up any part of the carving that needs it.
 Next you can texture the beard with a V-tool or leave it untextured. It's optional whether you wood burn the bottom of the cuts between the colors. On the example I did wood burn between the white parts of the hat and the rest of the piece. Then I like to scrub the piece with a stiff denture brush and liquid soap. After rinsing the piece, and letting it dry paint it.
2 comments:
Tom, Did you split the original square piece of wood? The finished Santa appears flat on the back when viewed from the front.
Rck Doone
It is indeed flat on the backside. I start with a 3/4"X6"X12" piece of Basswood. Use the tablesaw to rip the pieces at a 45 degree angle.
Post a Comment